If you think ice cream and chemistry have nothing to do with each other, guess again. After AP exams were over, the AP Chemistry class gathered in the junior parking lot May 24 to use chemistry to make bags of homemade ice cream.
Mr. Tranchi, who teaches the class, has held this ice cream-making party at the end of the course as long as he’s been teaching the class. In class, students learn the science behind ice cream, and then use their knowledge to create the frozen treats.
“As we’ve discussed the entire year, cooking is all chemistry,” said junior Natthaniel Kukurudz, a student in the class. “What we did here is applied some of the concepts that we learned.”
The ingredients and method are simple: sugar, milk, cream and flavoring are combined in a small plastic bag, which is then put into a larger plastic bag filled with ice and rock salt. The bag is shaken up vigorously for about 20 minutes. By then, the small plastic bag is filled with delicious soft-serve ice cream.
The science behind it is also relatively simple, Nathaniel explains.
“We added salt to the ice, so that it would depress the freezing point, making it cold enough to give the cream mixture a nice texture.”
When the freezing point is depressed, as it is in this experiment, the mixture is frozen but not turned into hard ice, making creamy ice cream.
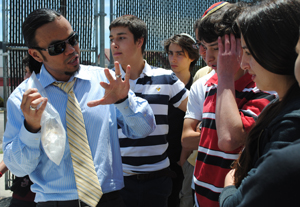
At lunchtime May 24, the class of 11 and four former AP Chemistry students gathered around Mr. Tranchi as he explained how to make the ice cream.
“Add one fourth teaspoon 4-hydroxy-3-benzaldehyde,” he said, as the students tried to remember what substance that was.
“That’s vanilla extract,” Mr. Tranchi laughed after a few seconds.
After he finished explaining the procedure, the students lined up to mix up their own batches. Almost everyone chose to make coffee-flavored ice cream, although they had the additional choices of vanilla or cookie dough.
Once the ingredients were assembled, students donned heavy gloves they brought from home, placed their ice cream mixture into a bag of salt and ice, and began to shake.
Over the next 20 minutes, the bags were vigorously shaken until the ice cream mixture turned creamy and the ice around it melted.
Junior Tziporah Thompson squeezed her homemade coffee ice cream into a cone before taking a satisfying bite.
“That’s so good!” she exclaimed as she took another.
Meanwhile, at the other end of the table of ingredients, past the group of students shaking plastic bags, sat a big block of dry ice.
“This is for the dippin’ dots experiment,” Mr. Tranchi said, nodding towards the block of smoking ice.
To show what he meant, he mixed the required ingredients in a bag then used a spoon to scoop a little bit out. Then he sprinkled the mixture in droplets onto the dry ice, occasionally flipping the droplets with his spoon. The end result were small ice cream ‘dots’ that closely resembled dippin’ dots ice cream.
Soon enough, students who were not in the AP Chemistry class began approaching the ice cream makers to see if they could taste some of the products of the experiment.
Although the mess left over was sizable and many an article of clothing was covered in several variations of ice cream, junior Ari Tuchman says it was worth it.
“It was the only reason I took the class,” he jested. “I never actually thought chemistry could be used for anything productive. The ice cream was definitely worth the suffering, hard work and reduction of my GPA by one point.”
You don’t need to be in AP Chemistry to make your
own ice cream! All you need is…
•1 tablespoon sugar
•1/2 cup milk or half & half
•1/4 teaspoon vanilla
•6 tablespoons rock salt
•1 pint-size plastic food storage bag (e.g., Ziploc)
•1 gallon-size plastic food storage bag
•Ice cubes
•Gloves (or you’ll get frostbite)
•Anything else for flavoring (strawberries, instant coffee, chocolate syrup, etc.)
1. Fill the large bag half full of ice, and add the rock salt.
2. Put milk, vanilla, and sugar into the small bag, and seal it.
3. Place the small bag inside the large one, and seal it again carefully.
4. Shake until the mixture is ice cream, which takes about 5 minutes. It will only reach the consistency of soft-serve.
5. Rinse off the top of the small bag, then open it carefully. Enjoy!

